|
|
|
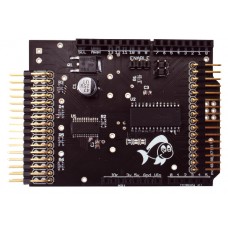
Expansion Shield, compatible with various Arduino boards and with our Fishino UNO that without virtually committing hardware resources, allows you to have as many as 16 outputs PWM and 16 additional digital inputs / outputs. Not only that, the sheets are overlapped up to a maximum of 8, allowing to manage with Arduino up to 128 digital and 128 outputs PWM additional I / O; all it made completely transparent to the user via a user-created library ad-hoc. N.B. Arduino / Fishino and RC servos are not included (see related products). |
|
Why it was made
|
|
As practical and capable of achieving countless applications, the Arduino boards compatible and have two limitations: the relatively reduced program memory and the reduced amount of available outputs, kind of I / O which may be assigned a PWM signal. For example, an Arduino / Fishino ONE has only six PWM outputs and, unless generate the related signals via software (with considerable commitment of the processor), allows the piloting of a driver, and then only a single LED RGBW power, or alternatively six monochromatic LEDs. The boundary itself emerges when you want to fly more than 6 servo motors with the same tabs; the realization of a type robots "hexapod", which requires well servos 12, is problematic, if not impossible. the inputs and outputs are also limited; always talking about Arduino boards, we have a total of 13 digital and 6 analog inputs I / O, also used in digital; It seems too abundant, except that many of these are used for devices on board or by the expansion shield. In practice, creating a project with a shield Ethernet / WiFi, an SD memory and requires serial output and some analog input, only six digital I / O are available that are often insufficient to medium complexity projects. |
|
Libraries
|
|
As already mentioned, for this card we have specifically designed a software library, called Octopus, equipped with some special features that make it easy to use. The first interesting feature of the library you can see from dell'include file lines (Octopus.h): #define Octopus __octopus() and from the source file lines (Octopus.cpp): OctopusClass &__octopus()
Wire.begin(); before the use of the library, it is impossible to create the static variable Octopus when loading the program, since the Wire interface that moment has not yet been initialized. // return number of boards founduint8_t getNumBoards(void) const; As mentioned earlier, the PWM frequency is unique for each card, then for each group of 16 PWM outputs; can be set using the following two functions, the first tab to tab and the second for all the connected cards in one command: // set pwm frequency for a single connected board In the first you should indicate the card number (ranging from 0 to Octopus.getNumBoards ()) and the PWM frequency, from 24 Hz to 1,526 Hz; the second is sufficient to indicate the frequency and all tabs will be set on that. At power up, the preset frequency is 200 Hz, suitable for servo control but also to LEDs. The PWM output value can be set, similarly to the Arduino libraries, using the following function: // pwm output For example, to set the exit 30 (the third last of the second board connected) to 50% of the maximum value, you must write Octopus.analogWrite (30, 2048); The optional third parameter, invert, is useful if you connect the LEDs outgoing exploiting the open collector outputs mode and by connecting the anodes to the positive; in this case it needs to reverse an output (more time remains high, less current flows in the LED) and it is therefore necessary to set the parameter
|
|
Sketch
|
|
Finally, we present a simple sketch that displays a "tail" light using 16 LEDs connected to the PWM outputs (Listing 1). for(int k = 0; k < 16; k++) for a sinusoidal shape, or for(int k = 0; k < 16; k++) for a bilinear trend. We conclude here the description of our Octopus card; you can now experience the different lighting effects using eg Hummingbird drivers presented in the last issue of Electronics In. |
|
Documentation and useful links
|
Octopus - Shield 16 I/O for Fishino and Arduino -kit
- Brand: Futura Group Srl
- Product Code: 7305-OCTOPUS
- Availability: In Stock
-
Price: 21.00€


